COMPLETE THE 5 STEPS BELOW FOR SUCCESS
WATCH THE PRE-RECORDED WEBINAR:
“NEW TO AUTOELEVATE? HERE’S WHAT YOU NEED TO KNOW TO GET STARTED WITH MANAGING CLIENT PRIVILEGES”
Check for an email with the subject line “AutoElevate Credentials and Next Steps“. If you have not seen it arrive within 15 minutes please check your spam filtering.
5 Steps to Success!
Click to jump to a basic step or go through the customized guided walk-through

Login

Deploy Agents

Set Notifications

Set Agent Mode

Test
Step 1: Log In To The Admin Portal
Open the email entitled “AutoElevate Credentials and Next Steps”. Find your credentials under section number 1 and login.
Step 2: Deploy Agents
Deploy Agents on a few Windows computers either manually, via script or with your RMM tool. Click on “More Info” if you get need specific instructions or need help.
Manual Deployment For Small Scale Testing
The AE MSI can be downloaded from the Admin Portal from the ‘Settings‘ screen under General Info -> Agent MSI.
You can install the Agent MSI manually on each machine which will allow you to specify client company names and locations for each installation. Manual installation is especially helpful if you are wanting to deploy a handful of Agents for testing or demonstration purposes. To install manually you will need to supply the following information during installation:
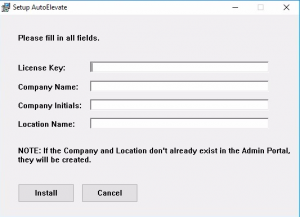
License Key: Provided to you upon Trial registration or purchase.
Company Name: Enter a client company name such as “Contoso, Inc.”. If the company name entered here does not already exist in the Admin Portal it will be created automatically.
Company Initials (Optional): Enter 2 or 3-character initials for the company which will serve as a quick reference in the Mobile Notification app. So as an example, for Contoso, Inc. you may want to enter “CI”. If this field is not included, we will automatically generate initials based on the name of the company.
Location Name: Enter a location name for the machine to be organized into such as “Laptops”, “Denver”, or “Main Office”. If the Location doesn’t already exist for the company it will be created automatically.
Scripted MSI Deployment
To generate an MSIEXEC command that has all the commandline options necessary to install the software, which you then can use with your RMM tool (or other deployment method) you would do the following:
- Portal, go to the ‘Companies’ tab
- From the AE Admin
- Create a new Company by clicking the “+” button at the top of the screen. Enter a Company Name and initials and click save.
- Create a new Location by clicking the “+” button, entering a location name (locations are machine groups which can be either actual locations or anything other criteria like ‘laptops’, or ‘desktops’) and then click save.
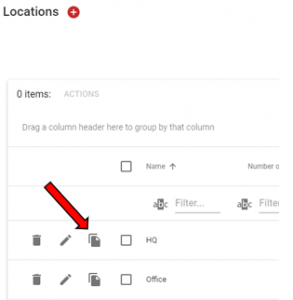
- Once the Location has been created click the icon next to the Location that looks like ‘papers’ and the system will generate an MSI command and arguments that you can use.
Deployment with Scripts and RMM Tools For Many Agents
- ConnectWise Automate
- Kaseya VSA
- N-central
- SyncroMSP: Look in your Syncro portal under scripts for the “AutoElevate (Official)” deployment script
- Datto RMM (with Autotask PSA)
- For a PowerShell script
Step 3: Set Up Notifications

![]()
Your Technicians can receive notifications of user privilege requests on their computer by enabling browser based notifications for the Admin Portal (https://msp.autoelevate.com ). Notifications from the browser service can also be configured to appear in the Windows 10 notification area so that you won’t need to keep your Admin portal open but would only need to have a browser open (so that the notification service is running) to be notified.
Google Chrome
In Chrome you would click on the “lock” in the top left of the browser. The lock next to the Left of the URL address. That should allow you to Allow/Block the notifications and a couple other settings.

To ‘reset’ it if it is already set to Allow. Set it to block, refresh and then do it again and set to ‘allow’ and refresh. This should enable notifications from the browser service.
Microsoft Edge
In Edge you would click on the “lock” in the top left of the browser. The lock next to the Left of the URL address then click “Site permissions” to open the screen containing the various permission settings.

Scroll down in the list to “Notifications” and change the down-down menu choice to “Allow”

.
Mozilla Firefox
In Firefox after logging into the Admin portal you should see an icon in the top left of the browser to the left of the URL address which looks like a chat icon and be given the ability to select “Allow Notifications”.

If this has already been set to ‘Never Allow’ you can change the setting in Firefox by clicking the ‘Hamburger’ menu on the right-hand side of the screen and then from the menu selecting “Options”

Click on “Privacy & Security” and then scroll down in the list to “Permissions” and click the “Settings” button next to ‘Notifications’

Find the Admin Portal address in the list and set the status drop-down to “Allow” and then “Save Changed”

Windows Notifications
To have the browser notifications show up in the Windows notification area you would first need to allow it in your browser and then would need to enable it in Windows by doing the following:
-
In Windows go to Settings->System->Notifications & Actions

-
Toggle the “Get notifications from apps and other senders” to “ON”

-
Scroll down through the list and make sure the browser that you have authenticated in AutoElevate and enabled notifications for (in this case Chrome) is toggled to “ON”

-
Click on the browser in the list and set the “Show notification banners” and “Show notifications in action center” to on by checking the boxes. You may also set the other notification settings based on your preferences here.

Step 4: Turn UAC & Live Mode On
Set Windows UAC to either On “Dimmed”, On “Not Dimmed”, or On “Maximum” as well as the turning AE Agent from “Audit” to “Live” mode in the Admin Portal.
Turn On And Control the UAC
AutoElevate automates a responses to Windows UAC events and therefore requires the Windows UAC setting to be turned on and configured properly.
Turn ON the Windows UAC
- In the Admin Portal (https://msp.autoelevate.com ) Go to the Computers screen
- Check the box next to the computer(s) you want to adjust the UAC setting for
- From the “Actions” menu select one of the “ON” settings from the ‘UAC Settings’ section (Not-Dimmed, Dimmed, or Maximum)
- Upon next agent check-in the Agent will pick up the new settings. To update your view of the status click on the “refresh” button at the top right hand corner.
Any of the AutoElevate “ON” settings are sufficient for AutoElevate to effectively work however DIMMED is more secure than NOT-DIMMED. For additional details please see: https://support.autoelevate.com/hc/en-us/articles/360000840432-Audit-Guide
* In either case If the UAC setting is changed from OFF-to-ON or ON-to-OFF, the machine will require a reboot for the change to take place. Changing the setting from AutoElevate will not initiate a reboot but AutoElevate will track and report the status in the Admin Portal ‘UAC Status’ field so that you can determine when the setting is in effect.
Identify systems that have UAC either turned OFF or set too low
In the Admin Portal -> Computers screen look in the data grid at the column entitled: “UAC Status” which displays if the UAC is on or off for the given computer. You can see the status of a given machine by scrolling through the list, can group the computers by their UAC status by dragging the “UAC Status” column to the top area of the grid, or filter the records using the filter at the top of the column.
Additionally, the columns “UAC Admin Level” show what ‘level’ the UAC slider would be set to in the user was logged in as an Admin, whereas the “UAC User Level” shows what ‘level’ the UAC slider would be set to if the user was logged in as a standard user. In either case ‘level 1’ would represent the slider being set all the way to the bottom setting (or ‘off’) and a ‘level 4’ would represent the slider being set all the way to the top setting.
For a more detailed description of the UAC Levels, slider positions, and how they map to AutoElevate pre-defined settings for the UAC or registry entries please see: UAC Levels & Windows User Account Control Settings – AutoElevate Support Center
System Overview – System Agent
What the Agent Does
The AutoElevate software that is installed on each computer monitors, reports on, and responds to UAC privilege events is collectively referred to as the “AutoElevate System Agent”.
The AutoElevate Agent operates in either “Audit”, “Policy”, “Live”, or “Technician” mode. Upon installation Agents are placed in Audit mode by default however for basic testing purposes the Agent should be changed into Live mode.
How to Change Agent Modes
In the Admin Portal (https://msp.autoelevate.com ) from the “Computers” screen select the check box next to the computer(s) that you would like to change, and then from the ‘Actions’ menu select “Set to Live” under ‘Agent Mode’.
Once the Agent checks in and picks up the setting (check-in happens every 5 minutes) you are ready to test. Refresh the data using the “Refresh Data” button in the top right hand corner to refresh your view, and then look at the ‘Agent Mode’ column to see if the Agents have picked up the new Agent mode setting.
Agent Modes Defined
- “Audit” - All UAC events are logged but the Agent does not respond to or apply defined rules and therefore no there is no change to the user experience.
- “Policy” - Policy mode will apply and process any defined rules but for any event that has no corresponding rule will NOT invoke the Real-Time evaluation process but instead will allow the UAC to appear to the user. Policy mode will allow an MSP to make and apply rules for key applications that have an immediate use case benefit but will not prompt the user or technician for evaluation of anything unknown.
- “Live” - All UAC events are intercepted and rules that that have been defined are applied (to either elevate with privilege or block) but for any event that has no corresponding rule the end user will be given the choice to proceed with a privilege request. The privilege request causes any technician with company access to be notified and opens a ticket (if the MSP has an integrated PSA ticketing system). The technician is presented with information on who is making the request, what they are requesting, the basic security disposition of the machine, and information on whether the application or action they are wanting is safe, along with the ability to respond to the user’s request in real time.
- “Technician” - Special mode enabling onsite Technicians to interact with the computer’s UAC prompts. Please see “Technician Mode” documentation on our support site.
More About The AutoElevate Agent Components
The components which make up the System Agent are the “AutoElevate Agent” service which is set to start automatically at Windows startup and then spawns the AEAlert and AEUACAgent applications once a user is logged in. When the AutoElevate Agent service is stopped, the computer resumes normal UAC functionality and UAC events are no longer tracked.
Please see “System Agent Installation” in our support documentation for more detailed instructions on Agent deployment options.
Leverage the Power of Autoelevate Rules
Witness the power of the fully operational Autoelevate, how to use and make rules and more
Make Rules in Real Time
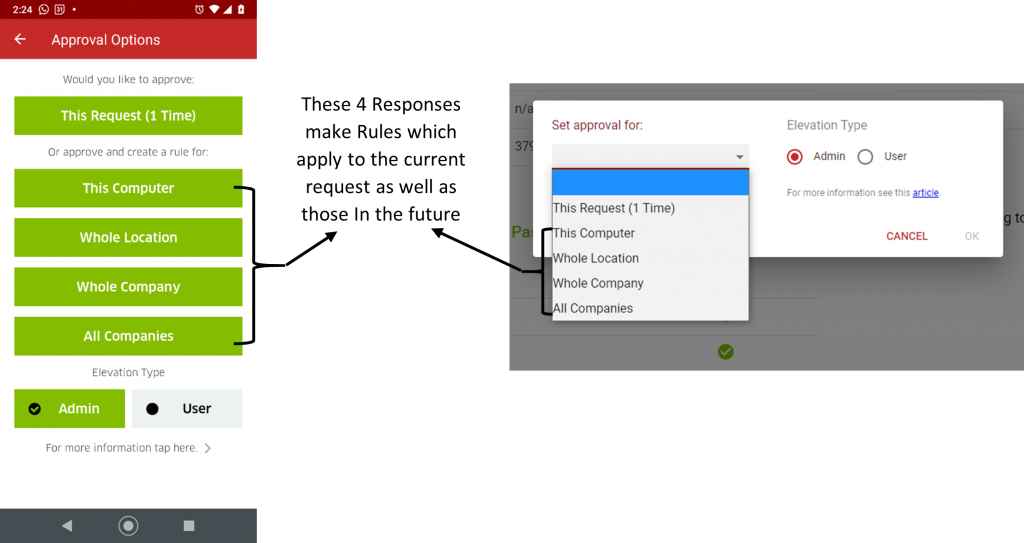
Each time you are presented with a Real-Timeprivilege request you can make a rule as part of the approval process which will not only approve the current request but will also apply to future UAC events for the Computer, Location (group of machines), Company, or Globally.
Make Rules from Events
Easily turn events into rules. From the “Events” screen in the Admin Portal (https://msp.autoelevate.com/) select a check box next to an UAC event record and then from the “Actions” menu select “Convert to Rule”, select whether to Approve/Deny and then whether you want the rule to apply Globally, a Company, Location, or a single Computer.
Change a Rule from Admin/User Elevation or vice-versa
From the “Rules” screen you can see that rules that have been made and the elevation type (Admin/User) that they are set to by looking what is listed in the “Elevation Type” column. To change an elevation rule from using Admin elevation to User elevation or vice-versa you would select the check box next to the rule and then from the “Actions” menu select either “Set to Admin” or “Set to User” under ‘Elevation Type’.
You can set the default elevation type from the Settings menu from the ‘Default Elevation Type’ drop-down under “Requests & Rules” [picture]
Delete/Move/Copy Rules
From the “Rules” screen you can Delete, Move or Copy rules. To delete simply click on the trash can next to the rule and confirm at the prompt. You can Move or Copy rules from the “Actions” menu.
- To Move rules from one Computer/Location/Company/Globally to another: https://support.autoelevate.com/hc/en-us/articles/360002665652-Moving-Rules
- To Copy rules from one Computer/Location/Company/Globally to another: https://support.autoelevate.com/hc/en-us/articles/360004331772-Copying-Rules
Limit a Technician’s ability to make Rules
To prevent a technician from being able to make rules you can set their User Role to “Technician (Level 1)” and/or adjust their Company access. Please see: https://support.autoelevate.com/hc/en-us/articles/360018899091-User-Management-from-the-Admin-Portal
Hopefully this information has been helpful. There is more information on this and other technical topics available on our support site at https://support.autoelevate.com or you can specifically email questions to support@autoelevate.com and we’ll be happy to assist.
Step 5: Test AutoElevate
On a test computer with standard permissions launch an action requiring admin privileges, proceed through the process using either AutoElevate Notify or the Notification from your browser
Elevation Types More Information
What do the different elevation types mean? and more.
What is the difference is between Admin / User elevation when doing an approval?
Admin elevation uses an ‘over the shoulder’ local Admin account (~0000AEAdmin) whereas User elevation also elevates to Admin privileges but it happens with the context of the logged in user.
When should you use User elevation vs. Admin elevation or vice-versa?
Admin elevation is ideal for the elevation of system functions, installation of most MSI and executables, examination of machines that have potentially been breached, or other Technician activities where security is a concern. With Admin elevation the credential being used for the Admin account is rotated and changed before and after every single use so that each elevation happens with a credential that is only good for that 1 moment in time, that 1 thing, is not stored anywhere, transmitted anywhere, and at rest is just a standard user account. Additionally, because Admin elevation is happening with just a local account the things elevated with Admin elevation won’t have access to mapped drives, network resources, or servers on your network(s) which can help you exercise the principle of least privilege and operate in a very secure way.
User elevation is ideal for installation, updates, or Line of Business applications that need to be done ‘as the user’. User elevation elevates to Administrator privileges but is done as the currently logged in user and therefore has the ‘context’ of that user. Things that are elevated with User elevation will have access to anything that the user has permissions to access on the computer like the user’s profile, HKEY Current User registry keys, App Data folder in their profile and also what they have access to on the network such as network printers, mapped drives, server shares, etc.
Here is an article that describes the elevation types that are used by AutoElevate: https://support.autoelevate.com/hc/en-us/articles/360030799571-Elevation-Types
How are User’s credentials stored for use with User elevation?
User elevation displays an additional dialog in the user process the 1st time it is used (and whenever the user’s password is changed) identifying the user that is logged in and asking the user to enter their Windows password and confirm it. Once submitted it is encrypted and stored locally in the Window Credential Manager (is not stored or transmitted off the machine) for use in any User elevation rule or action for the named user.
Can User’s credentials be pre-populated for use with User elevation?
YES. The dialog that is displayed during the User elevation process can be customized to suit your preferences and is typically sufficient communication for most MSPs implementing User elevation rules. Some AutoElevate partners prefer to assist their users by pre-populating this credential prior to the application of any User elevation rules or going Live thus eliminating the user being prompted for credential confirmation on the 1st user elevation event.
You can prepopulate the credential manually by communicating and coordinating with your users and then running the Credential Input dialog manually (c:\Program Files (x86)\AutoElevate\AECredentialInput.exe) thus allowing them to enter the Credential prior to an elevation event.
This could also be accomplished by going into Technician mode when the desired user is logged into Windows, running something that requires Admin privileges (anything producing a UAC), and then clicking the “User Elevation” button which will then cause the Credential input box to appear for the user. Once their credential has been successfully populated, user elevation can be used for that logged in user on that machine for approved elevations in Real Time or by a Rule without any further input by the user.
There is more information regarding this and other technical topics on our support site at https://support.autoelevate.com or you can specifically email questions to support@autoelevate.com and we’ll be happy to assist.
DO YOU HAVE ANY QUESTIONS?
How much does it cost and where do I get it?
AutoElevate is sold exclusively through our Manage Service Provider partners. Use the following links if you would like a partner to contact you with additional details, demo, pricing, or a free trial.
Is AutoElevate hard to deploy?
No. We’ve made it super easy so that it can deployed across your MSP practice in minutes. We’re here to help you every step of the way. AutoElevate is deployed by installing the AEAgent onto workstations. The AEAgent is a small lightweight MSI file which can be deployed silently with just about any RMM tool, System Policies, or manually by your administrators. For your convenience we have published a full set of ConnectWise™ Automate, Kaseya VSA™, Datto RMM™, SyncroMSP™, or PowerShell scripts which can help you deploy the agents throughout your environment within minutes.
How much memory and disk space does the AutoElevate Agent require?
The AutoElevate Agent is very lightweight, consisting of 3 processes that run once a user is logged in. The processes collectively use approximately 40MB of memory and 820KB of disk space. We have not experienced the agent causing any slowness or resource issues and have tested it on machines running with as little as 2GB of memory.
What outbound ports need to be opened on the firewall at our MSP and/or at our client sites?
443 outbound is all that should be required. So if you’re able to go to secure websites you should be OK.
What happens if my technicians don’t respond to a client request before the timer is up?
When the end user has made a request and the timer expires, an additional dialog box will appear that states that the technician is evaluating the request, a ticket has been opened and that they will be notified as soon as a technician responds. When a technician does respond, a new notification appears for the user telling them their request has been approved or denied and allowing them to continue the installation or with additional ticket information.
Does AutoElevate enter in my admin password for end users?
No. AutoElevate does not store, use, or modify your Admin credentials. AutoElevate gives you the choice on any rule or elevation request to use either an ‘over-the-shoulder’ style Admin elevation or to elevate with the context of the currently logged in user. AutoElevate interacts with the UAC directly when an elevation of an approved process is required, allowing for compatibility and elevation of complex applications. Credentials are not stored in a database or transmitted over the network making security tighter, faster, and easier to manage.
How does AutoElevate work?
AutoElevate automates Windows UAC prompts for MSPs. Our software Agent service works in the background to apply proactive elevation rules to each UAC event or to notify a technician through one of our PSA ticketing integrations, Windows notifications, or via our AutoElevate Mobile App (or all 3). Technicians can quickly and easily evaluate the request and build rules to either accept or deny the requested installer, application, update, or system action which can be allowed just one time, for just this single computer, for a group of computers, a whole client, or for all of the computers under your management. For more detailed information on how the AutoElevate system works please sign-up and visit our support site.
Are approvals app based or version based?
Approvals can be done based on either MD5 hash or a combination of information from the verified publisher certificate, name, and path. By identifying the file in these various ways, approvals or denials can successfully take place regardless of where the file originates and for a wide range of scenarios and requirements. Core applications and/or updates for applications such as Quickbooks™, Zoom™, or UPS WorldShip™ (or countless others) can be approved. With PAM automation you now have options.
Will adjustments need to be made to our installed antivirus?
None. AutoElevate works well with other solutions in your solution stack.
Am I charged for extra technicians?
With the release of the Enhanced Technician Mode features in 2020 each agent tier includes a corresponding number of technician user licenses with some licensing tiers including unlimited technician users. Currently, to have additional user licenses requires moving into a higher tier which includes the desired number of User (technician) licenses.
Who receives the notifications from end users?
All technicians that have the Mobile Notification app installed will receive notifications from your clients. They can quiet the notifications by adjusting notifications on their phones.
MSPs that use PSA ticketing integration (Autotask PSA, ConnectWise Manage, Kaseya BMS, & Syncro) can view notifications and approve or deny elevation requests directly in their PSA tickets. Tickets generated by AutoElevate have custom statuses which can be used to build customized notifications from within the ticketing systems. Requests can also be viewed and responded to from within the Admin Portal.
By enabling browser notifications technicians have easy 1-click access to approve or deny requests and receive notifications on their macOS or Windows computer desktops directly.
Do I have to have my own on-premise server?
No. AutoElevate is a cloud based service and software platform. All you have to have to get started is a license key and instructions. We maintain the server, the mobile apps, security, updates, and web portals.